|
|||||
 |
   |
||||
|
|
|
|||||
|
|
||||


|
|
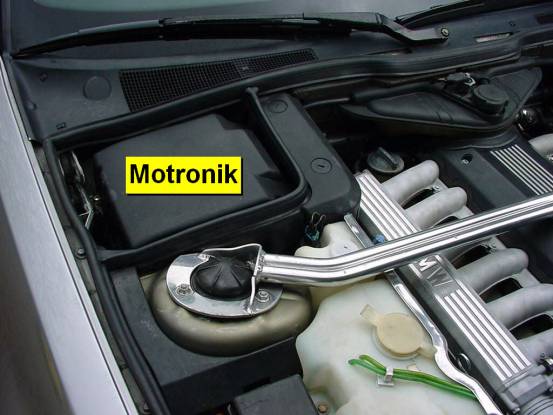
Installation instruction Chip in BMW Motronic for model E31 / E32 with M70 Motor (12 cyl.)Mounting guidelines from Wolf Ganssauge. PLEASE READ THIS INSTRUCTION TO THE VERY END BEFORE STARTING THE JOB! This is an installation instruction describing the exchange of the original chip with a reprogrammed high performance chip. The pictures are partially taken from a BMW E34 / 540i, but can also be referred to for other BMW models ECUs. Necessary tools Size 2 Philips head screwdriver, thin pliers or 3/8 ratchet with 10mm nut (see text), screwdriver about 5mm wide, screwdriver about 3mm and eventually a torx screwdriver (see text), normal pliers. Location of the ECU In the E32 the ECUs (the M70 engine has two ECUs, one per cylinder bank) are located under a large black plastic cap right in front of the bulkhead. This plastic cap is secured with 4 large Philips head screws.
What are the functions of the various ECUs? Under the plastic cap you find three units at the 850i/ci while you see four at the 750i/iL.
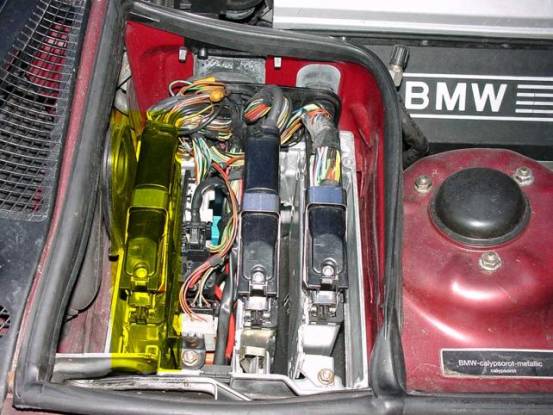
EML is the electronic throttle control unit. How to take out the DME and where to find the Motronic (DME) number? All ECUs are either secured with M6 nuts (earlier models) or secured with special clamps (later models). Prior to unmounting the units detach the big black connectors and carefully bend them aside. On the DME one can find several stickers. Only the large one is of any relevance carrying the number 0 261 200 xxx XXX stands for either 156 or 352.
Opening the DME After having taken out the DME the unit needs to be taken apart in order to change the socketed chip. First of all the cover carrying the number sticker needs to be taken off. On later units the aluminium cover is secured with additional torx screws which need to be taken out first.
Afterwards loosen the clamps on the back side of the unit. This is easiest with the 5mm wide screwdriver. Its a total of 6 clamps which like to break off on the aluminium covers which isnt a big dilemma though. The torx screws are strong enough to hold the cover.
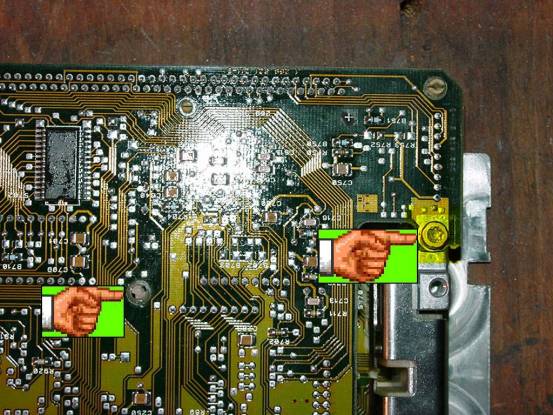
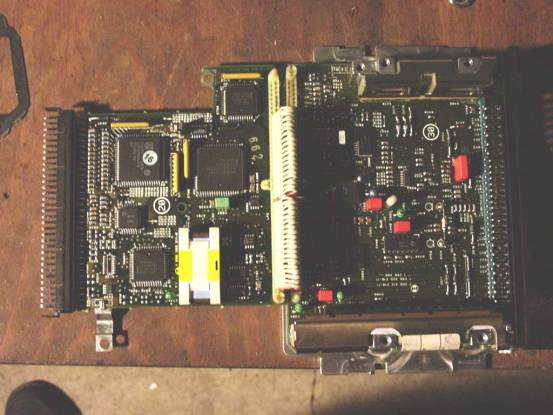
Now the cover can be taken off and the one of the main differences between the 156 and the 352 ECUs becomes obvious: The 156 ECU has two PCBs (printed circuit board) while the later 352 has only one. The next steps describe how to take apart a 156 ECU. If you have a 352 unit you can jump to the section describing the removal of the chip. Detaching the two PCBs from eachother (DME 156) The chip is located on the upper PCS hidden under an either black or white plastic cap. In order to get access to the chip you need to detach the two PCBs from each other which is a bit tricky. For this exercise you need both screwdrivers (3mm and 5mm) as well as the torx driver. The PCBs are attached to each other at five points: Via a torx screw, two plastic connectors in the back of the unit and in the front where the electric connections are. This is the tricky part because here the connection is over the full width of the unit plus additional clamping on each side. The fifth point is in the middle of the unit (white spot in the above picture). First step is to unscrew the torx screw securing the PCB to the units case. Next open the little white plastic connector in the middle of the PCB (see picture) connecting the two PCBs.
After this open the rear two plastic connectors by pulling them apart:
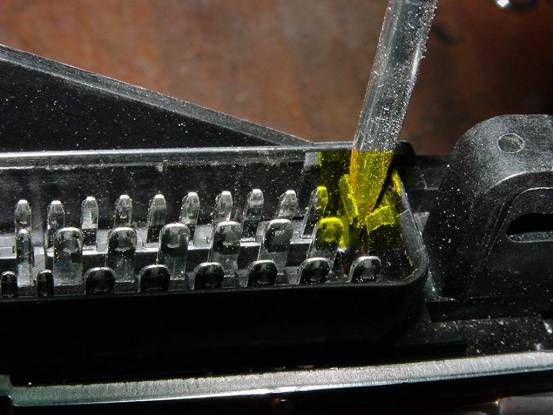
Now on the front side open the left and right plastic clamp:
Just bend them open with the 5mm screwdriver. Normally they stay in this position afterwards:
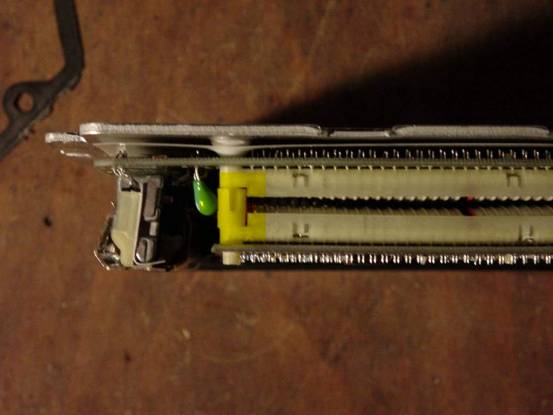
Now the horizontal clamping needs to be opened, which is tricky but possible
if you push the upper PCB backwards at the same time. Once you have achieved this it looks like on the below picture:
Now you can flip it open which looks like below:
After removing the plastic cap (the white one in the above picture, can be black as well) it looks like below:
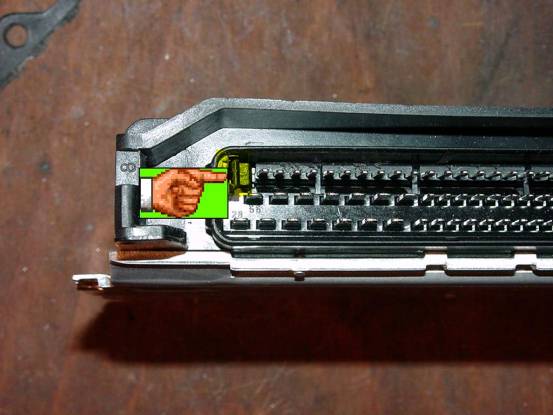
Carefully remove the chip from the socket by using the 3mm screwdriver. Please note that the chip has a little marking (slot) on one of the short sides pointing to where the finger is on the above picture. When installing the new chip make 100% sure the mark shows in the same direction. Mounting the chip the wrong way around can kill it !!! IMPORTANT INFO REGARDING THE M70 ENGINE: The M70 is controlled via two DME. The DME 0 261 200 156 has two PCBs with identical chips. These chips are interchangeable. The DME 0 261 200 352 has only one PCB and the two DMEs have DIFFERENT chips despite identical stickers on the original chips!!! Therefore the performance chips are also NOT IDENTICAL and must not be exchanged with each other. The performance chips are marked accordingly. If you exchange them by accident the engine wont even start. Also make sure NOT TO EXCHANGE the DMEs. If it should happen accidentally you wont damage the engine, but youll recognize a serious loss of performance. The Top speed limitation (Vmax) is NOT programmed into the DME chips but in the EML chip. In order to get rid of this limitation the EML chip needs to be replaced as well. The mechanical construction of the EML ECU is similar to the 156 DME. The necessary steps to open the EML ECU are according to the ones described before for the 156 DME. Your comment to the tips, tricks and guidelinesYou're repairing your 7series by yourself? Then write a report about it and sent it to me: Christian@TheTwinS74.de! If you uses the guideline, please give feedback for other users. Your opinion will be published on this site.
Your comment will be checked by the webmaster and be published on this site. |
|

|
 |
|
|
||
|
|
back to homepage | |||
| www.7er.com · all rights reserved · last change on this site: 2010/07/19 · mails to: webmaster@7er.com | ||||


 Tipps&Tricks Forum